How to Edit a Video Template in After Effects
Getting Started with Expressions in After Effects
An overview of expressions and relevant examples you can use in your next project
![]()
Expressions are a smart addition to any workflow or project. These snippets of code can reduce keyframes and layers on the timeline, convert values for animation flexibility, and condense multiple properties to a single control. They give artists the ability to affect values with math operations and create dynamic animation controls, but you don't have to be a programmer to use them.
Imagine being able to edit thousands of shape layer fills and color properties across your project with a single control; or arranging hundreds of layers in a perfect grid and then updating (or even animating) the grid spacing with a quick value change. All possible with a bit of code like this:
              src = effect("Grid Spacing")("Slider");
value * src
In this post, we'll take a look at the basics, apply an expression to a property, dive into four of my favorite one-line examples, and learn how to use them in your own projects. And if you'd rather watch video lessons, check out The World of Expressions training course for free on Animoplex. I encourage you to try expressions in your next project, even if you aren't quite comfortable with writing code yet. Your workflow will thank you!
What are Expressions?
Expressions are snippets of code that manipulate property values in your project. In Adobe's own words:
"An expression is a little piece of software — much like a script — that evaluates to a single value for a single layer property at a specific point in time."
These code snippets can link values across layers, compositions, time, and even spatial dimensions. This is useful when linking one property value to another. You're writing instructions to copy — and remain linked to — the source, so that all linked values update at once. Another benefit is swapping keyframes for expressions, which generates easily-configurable values at pinpoint accuracy. This is most notable with expressions like wiggle or loop; increasing the intensity or changing the loop duration is a quick number swap instead of copying, pasting, and removing keyframes.
Adding Expressions to Properties
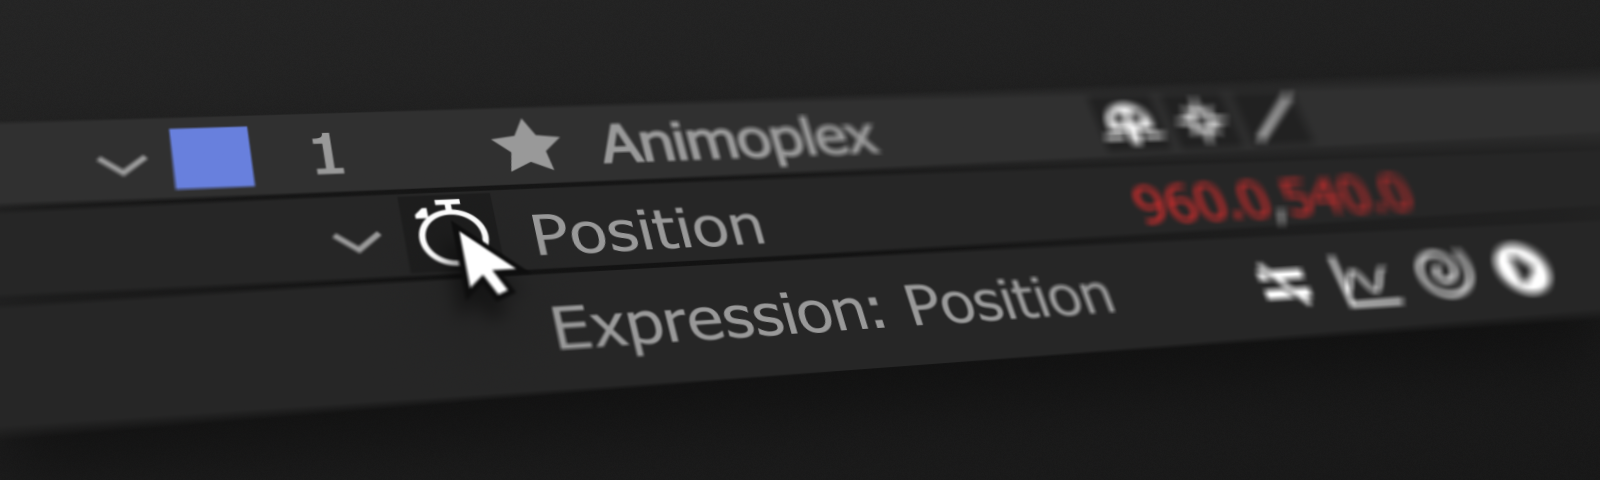
Any property that is keyframe-able can use an expression. To add or remove an expression, reveal the property in the Timeline and Alt + Click (Windows) or Option + Click (Mac) the stopwatch icon. When activated, options appear under the property and the value turns red. You can temporarily enable and disable an expression by toggling the equal sign (=) on and off.
The expression field is where you write the expression, and it's the text field on the timeline directly next to the expressed property. It works just like any text field; copy, paste, select, or click and drag text. Pressing enter creates a new line, and you can resize the height.
The "Pick Whip" is the drag-and-drop selection tool for linking in After Effects. Click and hold the spiral icon next to the expression to enter selection mode. A whip links to your cursor as you drag to another property. Releasing your click targets the property underneath, generating expression syntax automatically. This is a great way to learn expression syntax, let After Effects do all the work for you!
To unlock the magic of expressions, we need to understand how code affects a property value. Next, we'll cover a few expressions that are easy to write and can be used creatively in many different situations.
Wiggle Expression
If you've used After Effects, you're probably no stranger to the wiggle effect. For those who have not used wiggle, it's a great way to generate random and infinite movement. It can be applied using the Wiggler panel in the After Effects interface, but this process generates a lot of keyframes. The leaner method uses an expression, and is written with one line of code which results in clean motion and requires no keyframes.
To create a wiggle effect, enable an expression on a property and start with the word wiggle in the expression field. You'll need to know two important numbers: the wiggles per second (frequency) and the max amount of wiggle (amplitude) desired. Those numbers are then placed inside a set of parentheses; the first number is frequency and the second number is amplitude. Here's an example for the position property:
wiggle(2, 20) 
In addition to frequency and amplitude, advanced parameters can provide more control. These are optional third and fourth parameters that can be added inside the parentheses; the third is noise detail (octaves) and the fourth is amplitude multiplier. You can create a realistic steadicam wiggle effect on a camera's position by combining all four parameters like this:
wiggle(1, 10, 2, .25) 
When it comes to automating trivial tasks like random values, After Effects has a solution — use expressions!
Time Expression
Time is the backbone of After Effects, and there's a lot of potential unlocked when you mix time with expressions. A useful application for time-based animation is on Rotation or Fractal Noise. For constant motion, typically you'd add a keyframe on the first and last frames of the animation, then calculate the start and end values based on the desired speed. With expressions, simply multiply time by the value increase per second, and code does the rest.
To reference the current time in seconds, type the word time in the expression field. Pairing time with a math operation produces infinite animation, written like this:
time * 90 
You can alter the frames per second of a single property using the posterizeTime expression. This is possible without pre-comps or changing the composition frames per second. The posterizeTime expression creates a stop-motion effect on the property's final output. The number placed in parentheses sets the desired frames per second, and the expression requires a reference to the output. In most cases, you can use value like this:
posterizeTime(3); value 
You can think of time like an engine — a duration of steady output. Using time as a tool for animation is a smart way to work!
Value Expression
One the most useful expressions is the value attribute. It represents the property value at the current time, including the keyframed value. You can manipulate value with math operators and JavaScript methods, allowing systematic changes to the base property. Without value, many expressions would be difficult to implement. For value changes to a keyframed property, you'd need to edit every single keyframe every time you make a change. Value expressions allow you to add or remove numbers to existing keyframes, or even separate dimensions and affect a single axis.
To reference the current property, just add the word value in the expression. In this example, the property value (including keyframes) is divided by 2 across the entire timeline:
value / 4 
Another variation is the valueAtTime expression. It's used just like value except for one difference; the value is not locked to the composition's current time. You can use this to create delays across multiple properties and layers. Start with valueAtTime followed by a set of parentheses. Next, specify the time you want to evaluate, in seconds. This example replicates the scale value of the previous layer on a 1 second delay:
thisComp.layer(index - 1).transform.scale.valueAtTime(time - 1) 
Value is extremely versatile and is the best way to build relative expressions that utilize existing values and keyframes.
Linear & Ease Expressions
The linear and ease expressions are useful for converting values, perfect for Slider Controls and connecting numbers of different types. You're essentially taking a range of inputs and scaling them to a new set of outputs. This is near-impossible to do with a keyframe-only approach, and it demonstrates the power of dynamic values with expressions.
It starts with the word linear or ease and the input being converted is the first parameter inside the parentheses. The input min and max ranges are the 2nd and 3rd parameters, which then get mapped to the 4th and 5th parameters as the output range. This example uses ease to convert a rotation input to an opacity and scale output, simulating a dimmer switch:
ease(thisComp.layer("Dial").transform.rotation, 0, 360, 100, 0) 
An advanced example of the linear expression uses it to combine two outputs and fade between them. This is achieved by mapping an input to control the fade from one expression to the other. Start by linking a Slider Control to a variable, s in this example. Next, add two expressions as variables to fade between a and b. Finally, add a linear expression to map the input and output, crossfading between both expressions as the Slider Control animates. In this example, the expression fades from the keyframed position to a wiggle expression:
            s = effect("Slider Control")("Slider");
a = transform.position;
b = wiggle(2, 120);
linear(s, 0, 100, a, b) 
As a bonus, linear can be paired with time to create auto-fading expressions based on layer in and out points. Very handy for editing!
The World of Expressions — Free Training

For those interested in learning more about After Effects expressions, I've provided a free 5 hour expressions course on Animoplex. It's called The World of Expressions and is geared towards artists of all skill levels, designed as a visual programming course created for animators:
The course starts with an introduction and tour of the expression interface, followed by a casual walk through of the expressions found in this post. You'll then practice some intermediate expressions, working with different types of data and how to leverage property values in interesting ways. Advanced concepts are next and cover useful workflows and expert-level tips and tricks. Finally, the JavaScript series focuses on the core of expressions, programming syntax and the fundamentals of how expressions are written.
To access the project files and offline lesson videos, you can purchase the optional course materials for $10 USD on Gumroad. This helps support future course development, including an upcoming UX Rigging course!
This is my first post to Medium, it's been a fun process condensing everything to a short format write-up for a general audience. If you'd like to see more of this, clap or comment below to let me know. If there's an interest, I'll turn this into a series. Thanks for reading!
How to Edit a Video Template in After Effects
Source: https://medium.com/animoplex/getting-started-with-expressions-in-after-effects-animoplex-cfc4c287674e
0 Response to "How to Edit a Video Template in After Effects"
Post a Comment